Saturday 13 April 2013

Trend -Textured Polishes

I went to London a couple of weeks ago and went to a Nails Inc retailer to find a replacement ffor a bottle of nail varnish that I'd been given as a Christmas present but the bottle had broken. Luckily they had it (and I'd been looking for it for ages!) so, I was able to get my Nails Inc Sprinkles "Sweets Way", but what I also found was just too incredible. Nails Inc have brought out a new textured nail varnish called "Feathers". It comes in four different colour combinations called "Edinburgh", "Cornwall", "Chester" and "York" and they're made up of what look like tiny little hairs which, when painted on nails, look like feathers. I got the "Chester" colour (as that was the only one left in the shop), but they're all AMAZING! I've been wanting to do a peacock themed design for ages and think that I might be able to incorporate this somehow. The first time I used it, I just did a ring finger feature nail, with the rest painted in a peacock green and I was so impressed! The picture below shows the colour combination. I did three coats of feathers on top of a coat of green, but I probably could've got away with two.

Of course, I was concerned about how difficult it was going to be to take off, with there being so many coats, but I coated a cotton wool pad in nail varnish remover, placed it on the "feather covered" nail and wrapped it in tin foil. I left it for a while (whilst I cleaned off my other nails) and then just pulled the coverings off and ALL of the nail vernish came with it! No problem!

And there are loads of other really great textured polishes out there at the moment! Barry M have 4 pastel shades of "Textured Nail Effects" polishes - perfect for a summer 'street' look. Nails Inc (again) have the concrete, leather and denim effect polishes. And Illamasqua have their "Speckled" collection. These are totally easy to apply and give incredible impact for very little work.

If you fancy putting in a bit more effort, nail caviar gives an absolutely stunning result. Paint on a base colour, cover with a top coat and, whilst still wet, dip into the pot of caviar, gently press on and leave to dry. I got my nail caviar from Amazon.co.uk (search for 'Nail Perfection Micro Beads' and they work really well. They don't necessarily last for days...but to make a statement with your Saturday night out outfit, they really are great.


So, for a Spring nail look that has maximum impact for little effort, go for a textured polish to give your manicure an on-trend update!

Saturday 9 March 2013

Mothers' Day Bouquet

Mothers' Day gives us the perfect opportunity to show our mums just how much we love them. And what better way to do it than with a beautiful bouquet. To celebrate Mothers' Day, I've come up with a floral feature nail design which perfectly captures the start of spring (despite the fact it was SNOWING today!) and would be a lovely manicure to treat your mum to!


Start by painting your nails in the base colour. I went for a pastel pink to fit in with the spring theme. I absolutely love Nails Inc varnishes, and this one is Nails Inc Elizabeth Street. I did need 2 coats to completley cover my nails (with it being so light I think) but it goes on so easily and has a really nice finish to it.


Then, using a light green create the stalks of your bouquet, and a darker green to create texture. I used a striping brush to do both. Make sure it's loaded with quite a lot of the nail varnish to avoid it streaking. Use a dotting tool to create the tops of your flowers. I used a pale yellow colour, but this would work with any colour - dark pink, lilac, red, blue...it's up to you. Again using the striper, use a different colour to create the shapes and highlights of the flowers. I used a dark orange to go with the yellow, but you could try using a different shade of the same colour to do this (for exaple lilac flowers with purple highlights) to create a similar effect. Finally, tie your bouquet up with a bow. I used a dark pink but you could use any colour you like.


And your bouquet is complete! I just did this design on my ring finger of both hands and left the other nails plain pink, but if you wanted, you could just do a single flower on the rest of your other fingers by using the dotting tool to create the flower, a striper to create the details with the darker colour and to put a small leaf on either side of the flower. Let me know which colour combinations you've tried!

Colours used, from left to right:
Nails Inc - Elizabeth Street
Barry M - Spring Green
Barry M - Gelly Hi-Shine - Watermelon
Marks & Spencer - from a set of 4 mini pastel colours
Leighton Denny - I Love Juicy
No 7 - Perky

Thursday 14 February 2013

Nail Varnish Withdrawal Symptoms

I'm not doing a step-by-step tutorial today. Instead, I have a sin to confess...I went for two whole days with unpainted nails. TWO WHOLE DAYS! That's like forever...But I do have a very good reason.

One of my friends, Rosie, is doing a beauty course at our local college and is getting on really well! Fortunately for the rest of us, that means she needs model clients to practise on. I went a few weeks ago and she gave me a wonderful facial and pedicure, and this week, one of her classmates did an amazing facial and manicure for me! It was perfect!

My hands were treated to being properly pampered. My cuticles were properly pushed back and my nails were buffed to a natural shine. They felt so soft, and looked so healthy without nail varnish on them, that I left them as they were until had chance to paint them properly two days later.

The moral of the story is, as great as it is to give yourself a manicure, occasionally it is nice to have a professional do it for you.

Having said that, it is Valentine's Day, and I've had my two days nail varnish free - so here's a picture of my "lovely" design. Even if you don't have a special someone, the most important thing is to love the things in life that you do have. I've got some wonderful friends, and this design is the idea of one of the best! Thanks Amy <3 x


Pink is Avon, "Viva Pink". Pearl is O.P.I., "She's Golden".

Wednesday 6 February 2013

Alternative French Tips - Tutorial

French Tips are where nail art started I guess. More than just a plain colour, they add detail and interest to your finger tips. But...they're really hard to get right! It's hard to get the right amount of colour on the tip (especially on your "wrong" hand), and keeping the line straight and neat is even more difficult. So I like to do an "alternative" take on the classic design. By using straight lines, rather than the traditional curve, and two lines of colour rather than one, this classic look is updated! And this is another tutorial that's so easy to make your own - any colour combination will work great, so your nails can match your mood, outfit or the season's trends.


And here's "how to"...
The best place to start is to plan your colours. I like to go for two complimentary shades, with a metallic varnish inbetween. In the picture above, I've gone for a Wonder Woman inspired design with red, gold and blue, and in the tutorial, I'm showing you pink, purple and silver.
Cleaning your nails, apply a base coat to protect your nails, and paint two coats of your base colour, in my case pink.


Once its dried, use the middle colour's brush and paint from two-thirds down one side, up to the middle of the tip. Then do the same on the other side. The two lines should just cross over in the middle. Dont worry about getting it on the sides of your nail, on your skin - the main thing is to paint on the colour in one sweep to ensure that the line is straight.


Next, do exactly the same with the top colour leaving a small amount of the middle colour showing. Use the line of the metallic colour to guide the line you make with the top colour. Make sure you leave an even coat of the nail varnish, and, if the colour isn't covering, wait for it to dry a bit and then paint another coat.


Because you've got so many layers of colour on your nails, it will probably take a long time to dry, and even when it's dry to the touch it will probably still indent if you mess with it. Finish with a top coat and use a cotton bud, or make up brush, dipped in nail varnish remover to get rid of all the mess from the sides of your nails. And you're done!


As I said, this design is so customisable. My favourite way to do this design is with lilac base, sliver middle and darker purple tip, with a matt coat on top. I also inverted the colours on the ring finger to add a bit of interest. I like doing a metallic coat in between, but you could do anything you wanted. How about mixing the Alternative French Tip and the Ombré tutorials and doing three different shades of the same colour going from light to dark?

Let me know the combinations you've tried in the comments.

Sunday 27 January 2013

Winter Wonderland: Ombré Tutorial

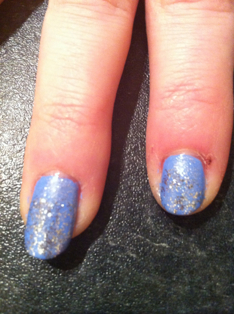
I know I said my next post was going to be an alternative to the French tip manicure...but then it snowed and everything looked so beautiful and I couldn't resist creating a Winter Wonderland design (inspried by this cutepolish Disney 
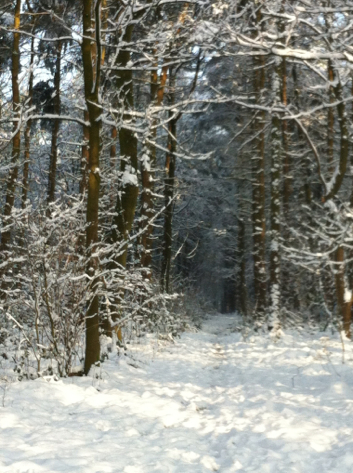
tutorial). Here's a picture of my "Narnia"; I went for a walk in the snow on my lunch break at work, but felt like I'd gone to another world!


This snow scene design also gives me the opportunity to talk about other types of ombré designs that you can try.

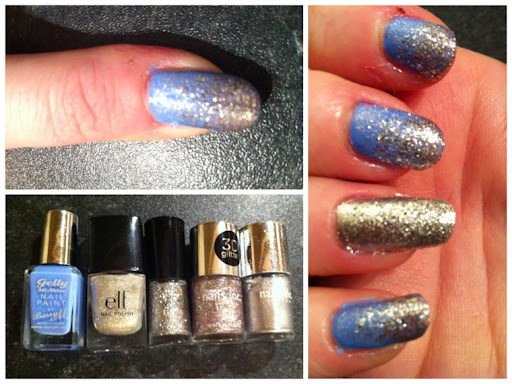
So back to my Winter Wonderland...start by preparing your nails, applying a base coat, and two coats of a light blue. I used Barry M's "Blueberry" from their Gelly range. Ideally, I'd use something lighter, more of a pastel blue, but I didn't have anything to hand.


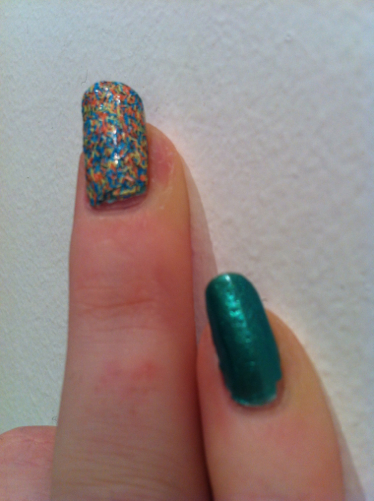
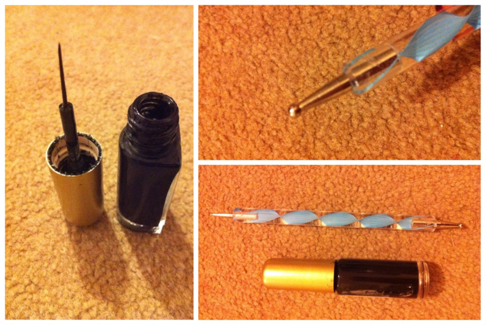
Then use glitter nail varnishes to layer up your sparlinking snow, from the cuticles to the tips. I used a thin layer of a silver glitter with small pieces (namely E.L.F "Glitter Glam"):


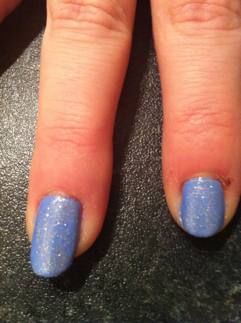
...followed by a sliver glitter with larger pieces: No. 7, "Glitterball":


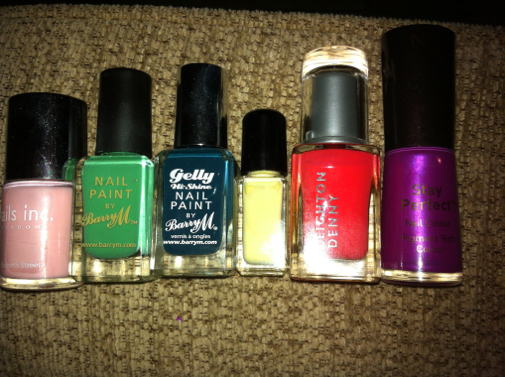
...and finally Nails Inc. "Devonshire Street", which has a silvery base colour with a purply tone too:


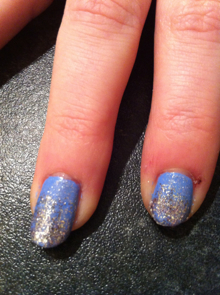
So, I did the blue as my base, then a thin coat of the E.L.F right to the cuticle, then the No. 7 from about a third of the way up to the tip, then the Nails Inc. from two-thirds up to the tip and finally I ran the Nails Inc. just across the tip once more.

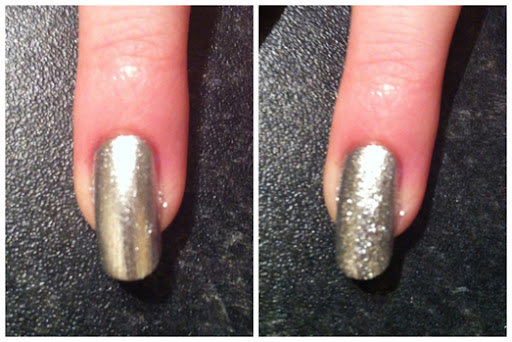
As a feature nail, on my ring finger, I used a silver colour base (Nails Inc. "Cambridge Terrace"), and covered it with the No. 7 "Glitterball" I used on the rest of my nails. I find that putting a glitter of the same colour on top of a base gives the colour an extra dimension.


And, once I've finished it off with a top coat, my Winter Wonderland is complete!


Other variations are black base with a silver glitter, for a night-time snow scene, or a deep navy blue, with gold glitter for a starry night, but can really do any colours you like with this same technique!

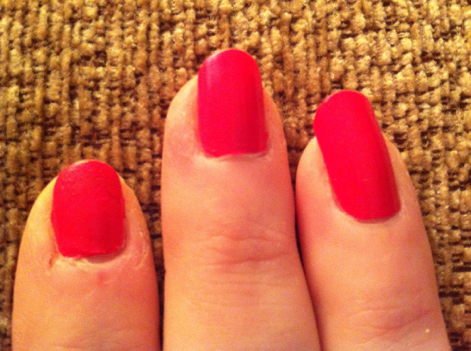
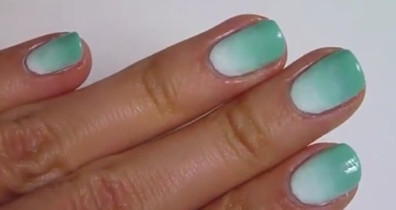
I promised other ombré ideas - so, instead of doing the fade across one nail, you could try fading across all of your nails. To do this, you'll need 5 (or 10, if you're brave) different shades of the same colour. Then, starting on either your little finger or your thumb, paint the lightest colour and moving across your hand increase the shade on each finger. I've done this with pinks (as shown below) and greens and well as from white to black (or "5 shades of grey", you could say) but would be great with blues, silver through to gold, yellow to orange or with purples. What I would say is that you should plan this before you do it...paint the colours, in order, on paper or card before you paint them on your nails: the colour you see through the bottle isn't always the colour it looks when painted!


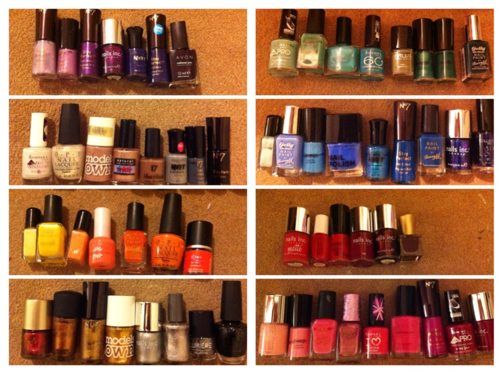
The colours I used (from light to dark) are:


Nails Inc "Elizabeth Street"
Barry M "Bright Pink"
Avon "Viva Pink"
No. 7 "Perky"
Nails Inc "Piccadilly Circus"


Another idea is to use a makeup spongue to create an ombré fading effect going up your nails (rather than using glitter as I did in my tutorial). I've not quite perfected this yet but there's a really great tutorial by pixiepolish and with a bit of practice, you too could get this great effect.

(Design by pixiepolish)

Enjoy creating your own Narnia (let me know how you get on in the comments) and I promise I'll do my alternative French tips tutorial next!

Saturday 19 January 2013

Leopard Print Tutorial

For my first step-by-step tutorial, I thought it'd be best to show you my "go to" design - an easy leopard print.


With neutral colours, it'll go with any outfit and is really simple, but so effective. I like to do this with a feature nail on each of my ring fingers and designed tips on the rest of my fingers, but you can totally mix and match. This would look great with plain fingers and just a feature nail, all designed tips, or all fully designed - you can really make this as complicated as you feel! This design was inspried by this ihaveacupcake tutorial and here's my take on it.

Start, as always, by cleaning off your previous design, washing your hands and moisturisng. To try this design, you'll need:


a good base coat, a neutral, nude colour as your base, a bronze or a brown for the spots, a black striper (or a black varnish and a striping brush), and a top coat (I tend to use a matt effect top coat with this design). A dotting tool would also be useful, but is not essential. If you don't have a striper brush, you could try using the point of a cocktail stick. My varnishes are: Sally Hansen "Double Duty", Model's Own "Nude/Beige", Mac "Originality" and Rimmel "Matt Finish".

Start by painting all of your nails with a base coat, and two coats of the nude colour. Next, paint bronze, irregular sized dots on the tips of all of your nails and the whole of your ring finger nails using the dotting tool (or, carefully, with the paint brush as I did in the picture below).


You should make the spots different sizes, and they shouldn't be perfectly round. Leave some hanging off the tips and the sides of your nails too. Then, use the black striper to draw lines around two edges of the bronze spots. Don't make them all uniform - do some lines on the top and bottom of the spots, and some to the left and right. My black striper tends to get really gloopy so I pour a few drops of nail varnish remover into it, put the lid on and give it a good shake and it thins out well enough to use. You'll probably have to do it every few times you use it, but it's easy enough to do. It's an old trick, but it seems to work!


Now - leave your nails to dry. For as long as possible. Like, a LONG time! You could even leave your design as is and cover with a top coat the next morning to avoid smudging your black lines. Then use either a matt effect top coat, or a regular top coat (you can use Double Duty as a top coat as well as a base coat).


Et voila! You're ready to enjoy the compliments your bound to receive!

My next post is going to be tutorial showing an alternative to the classic french manicure which is even easier to personalise than this one!

Thursday 10 January 2013

Nail Art: The Basics

In my last post, I gave you a list of "manicure essentials": in this post, I'm going to outline "nail art essentials". You won't need everything on the list for every design, but they're certainly good things to have for when you need them.

So, let's start at the beginning, and the end - base and top coats. A base coat is essential for protecting your nails underneath, and stopping them turning an awful colour when you remove your design. Top coats give your design a nice sheen: with glitter manicures, a top coat can stop your nails feeling rough to the touch and with smooth manicures they can help seal in the design (and stop your varnish chipping). I use Sally Hansen, usually "Double Duty" (which can be used as a base and top coat) which I love, but you have to be careful as it can sometimes smudge the detailing of your designs. At the moment I have the separate base and top coats which work brilliantly too.
Another great nail art staple is a matt effect top coat. The one I use is by Rimmel. This looks great just over plain polish, but can be used for creating textured french tips (as opposed to creating them with different coloured varnishes), creating detail, or giving a luxurious finish to your nail art designs.


To create intricate designs, you'll need a striper and dotting tool(s). The striper I use the most is part of a black polish (which is great, as most detailing is done in black). You can also buy sets of nail art brushes, which can then be cleaned using nail varnish remover and water. Dotting tools are used for creating polka-dot style details and you can get them in sets with tips of differing sizes. If you don't have them, you can use cotton bus or cocktail sticks as an alternative (but you can find them online - they're relatively inexpensive).


Of course, nail art requires a variety of different colours. I have a lot (like...a LOT) of different colours, but you can just get them as you go. You'll work out which brands you like best, and the more expensive ones won't always be the ones you like. It's nice to splash out on colours you use the most, to get the best quality you can (like black, red, pink, nude), and maybe save a bit on colours you only use rarely (yellows, oranges etc.).


Creating great designs can also take a bit of time - for intricate designs where you have to wait for each coat to dry before adding a new one, you can be waiting quite a while. And once you're done, you'll also need to make sure you leave them to dry fully before doing anything. So the last item on my "essentials" list, is the time and space to work on your design to make it the best it can be. Most designs usually take around an hour to create...but remember you also need drying time after that!

In a future post, I plan to outline other nail art products which can be used to create great manicures, other items which you might want to try. My next post will be my first step-by-step tutorial, and it's a design I've done time and time again - I hope you'll enjoy doing it as much as I have!